3. Set up BinderHub#
BinderHub uses Helm Charts to set up the applications we’ll use in our Binder deployment. If you’re curious about what Helm Charts are and how they’re used here, see the Zero to JupyterHub guide.
Below we’ll cover how to configure your Helm Chart, and how to create your BinderHub deployment.
3.1. Preparing to install#
To configure the Helm Chart we’ll need to generate several pieces of
information and insert them into yaml files.
First we’ll create a folder where we’ll store our BinderHub configuration files. You can do so with the following commands:
mkdir binderhub
cd binderhub
Now we’ll collect the information we need to deploy our BinderHub. The first is the content of the JSON file created when we set up the container registry. For more information on getting a registry password, see Set up the container registry. We’ll copy/paste the contents of this file in the steps below.
3.2. Create secret.yaml file#
Create a file called secret.yaml, we’ll set sensitive values to pass to our
Helm chart in this file.
3.2.1. If you are using gcr.io#
Add the information needed to connect with the registry to secret.yaml.
You’ll need the content in the JSON file that was created when we created
our gcr.io registry account. Below we show the structure of the YAML you
need to insert. Note that the first line is not indented at all:
registry:
  url: https://gcr.io
  # below is the content of the JSON file downloaded earlier for the container registry from Service Accounts
  # it will look something like the following (with actual values instead of empty strings)
  # paste the content after `password: |` below
  password: |
    {
      "type": "<REPLACE>",
      "project_id": "<REPLACE>",
      "private_key_id": "<REPLACE>",
      "private_key": "<REPLACE>",
      "client_email": "<REPLACE>",
      "client_id": "<REPLACE>",
      "auth_uri": "<REPLACE>",
      "token_uri": "<REPLACE>",
      "auth_provider_x509_cert_url": "<REPLACE>",
      "client_x509_cert_url": "<REPLACE>"
    }
3.2.2. If you are using Docker Hub#
Update secret.yaml by entering the following:
registry:
  username: <docker-id>
  password: <password>
Note
<docker-id>and<password>are your credentials to login to Docker Hub. If you use an organization to store your Docker images, this account must be a member of it.
3.2.3. If you are using Azure Container Registry#
Update secret.yaml to include the following:
registry:
  url: https://<ACR_NAME>.azurecr.io
  username: <SERVICE_PRINCIPAL_ID>
  password: <SERVICE_PRINCIPAL_PASSWORD>
where:
<ACR_NAME>is the name you gave to your Azure Container Registry,<SERVICE_PRINCIPAL_ID>is the AppID of the Service Principal with AcrPush role assignment,<SERVICE_PRINCIPAL_PASSWORD>is the password for the Service Principal.
3.2.4. If you are using OVH Container Registry#
Update secret.yaml to include the following:
registry:
  url: https://<hash>.<region>.container-registry.ovh.net
  username: <harbor-username>
  password: <harbor-password>
where:
<hash>is the hash of the registry<region>is the region of the registry<harbor-username>is the Harbor username<harbor-password>is the Harbor password
3.3. Create config.yaml#
Create a file called config.yaml and choose the following directions based
on the registry you are using.
3.3.1. If you are using gcr.io#
To configure BinderHub to use gcr.io, simply add the following to
your config.yaml file:
config:
  BinderHub:
    use_registry: true
    image_prefix: gcr.io/<google-project-id>/<prefix>-
Note
<google-project-id>can be found in the JSON file that you pasted above. It is the text that is in theproject_idfield. This is the project ID, which may be different from the project name.<prefix>can be any string, and will be prepended to image names. We recommend something descriptive such asbinder-dev-orbinder-prod-(ending with a-is useful).Note that in both cases, you should remove the
<and>symbols, they are simply placeholders in the code above.
3.3.2. If you are using Docker Hub#
Update config.yaml by entering the following:
config:
  BinderHub:
    use_registry: true
    image_prefix: <docker-id OR organization-name>/<prefix>-
Note
``<docker-id OR organization-name>`` is where you want to store Docker images. This can be your Docker ID account or an organization that your account belongs to.
``<prefix>`` can be any string, and will be prepended to image names. We recommend something descriptive such as
binder-dev-orbinder-prod-(ending with a-is useful).
3.3.3. If you are using Azure Container Registry#
If you want your BinderHub to push and pull images from an Azure Container Registry (ACR), then your config.yaml file will look as follows:
config:
  BinderHub:
    use_registry: true
    image_prefix: <ACR_NAME>.azurecr.io/<project-name>/<prefix>-
  DockerRegistry:
    token_url: "https://<ACR_NAME>.azurecr.io/oauth2/token?service=<ACR_NAME>.azurecr.io"
where:
<ACR_NAME>is the name you gave to your ACR,<project-name>is an arbitrary name that is required due to BinderHub assuming thatimage_prefixcontains an extra level for the project name. See this issue for futher discussion. If this is not provided, you may find BinderHub rebuilds images every launch instead of pulling them from the ACR. Suggestions for<project-name>could beACR_NAMEor the name you give your BinderHub.
3.3.4. If you are using OVH Container Registry#
If you want your BinderHub to push and pull images from an OVH Container Registry, then the config.yaml file will look the following:
config:
  BinderHub:
    use_registry: true
    image_prefix: <hash>.<region>.container-registry.ovh.net/<prefix>-
  DockerRegistry:
    url: https://<hash>.<region>.container-registry.ovh.net
    token_url: https://<hash>.<region>.container-registry.ovh.net/service/token?service=harbor-registry
where:
<hash>is the hash of the registry<region>is the region of the registry<prefix>corresponds to the image prefix. If you created a new project calledmyprojectin the previous section, then<prefix>should start withmyproject/
As an example, the config should look like the following:
config:
  BinderHub:
    use_registry: true
    image_prefix: abcde.gra7.container-registry.ovh.net/myproject/binder-
  DockerRegistry:
    url: https://abcde.gra7.container-registry.ovh.net
    token_url: https://abcde.gra7.container-registry.ovh.net/service/token?service=harbor-registry
3.3.5. If you are using a custom registry#
Authenticating with a Docker registry is slightly more complicated. BinderHub knows how to talk to gcr.io and DockerHub, but if you are using another registry, you will have to provide more information, in the form of two different urls:
registry url (added to
docker/config.json)token url for authenticating access to the registry
First, setup the docker configuration with the host used for authentication:
registry:
  url: "https://myregistry.io"
  username: xxx
  password: yyy
This creates a docker config.json used to check for images in the registry and push builds to it.
Second, you will need to instruct BinderHub about the token URL:
config:
  BinderHub:
    use_registry: true
    image_prefix: "your-registry.io/<prefix>-"
  DockerRegistry:
    token_url: "https://myregistry.io/v2/token?service="
If you setup your own local registry using
native basic HTTP authentication
(htpasswd), you can set token_url to None.
Note
There is one additional URL to set in the unlikely event that docker config.json
must use a different URL to refer to a registry than the registry’s actual url.
If this is the case, registry.url at the top-level
must match DockerRegistry.auth_config_url:
registry:
  url: "https://"
It’s not clear that this can ever be the case for custom registries, however it is the case for DockerHub:
registry:
  url: "https://index.docker.io/v1"
config:
  DockerRegistry:
    url: "https://registry-1.docker.io" # the recommended registry URL
    auth_config_url: "https://index.docker.io/v1" # must match above!
    token_url: "https://auth.docker.io/token?service=registry.docker.io"
however, BinderHub is aware of DockerHub’s peculiarities
and can handle these without any additional configuration
beyond registry.url.
Important
BinderHub assumes that image_prefix contains an extra level for the project name such that: gcr.io/<project-id>/<prefix>-name:tag.
Hence, your image_prefix field should be set to: your-registry.io/<some-project-name>/<prefix>-.
See this issue for more details.
<some-project-name> can be completely arbitrary and/or made-up.
For example, it could be the name you give your BinderHub.
Without this extra level, you may find that your BinderHub always rebuilds images instead of pulling them from the registry.
3.4. Install BinderHub#
First, get the latest helm chart for BinderHub.:
helm repo add jupyterhub https://jupyterhub.github.io/helm-chart
helm repo update
Next, install the Helm Chart using the configuration files that you’ve just created. Do this by running the following command:
helm install <choose-name> jupyterhub/binderhub --version=0.2.0-3b53fce --namespace=<choose-namespace> -f secret.yaml -f config.yaml
This command will install the Helm chart released on March 3rd, 2019 as
identified by the commit hash (the random string after 0.2.0-), which is
provided as a working example. You should provide the commit hash for the most
recent release, which can be found
here.
Note
--versionrefers to the version of the BinderHub Helm Chart. Available versions can be found here.nameandnamespacemay be different, but we recommend using the samenameandnamespaceto avoid confusion. We recommend something descriptive and short, such asbinder(you may need to, for example, runkubectl create namespace binderfirst).If you run
kubectl get pod --namespace=<namespace-from-above>you may notice the binder pod inCrashLoopBackoff. This is expected, and will be resolved in the next section.
This installation step will deploy both a BinderHub and a JupyterHub, but they are not yet set up to communicate with each other. We’ll fix this in the next step. Wait a few moments before moving on as the resources may take a few minutes to be set up.
3.5. Connect BinderHub and JupyterHub#
In the google console, run the following command to print the IP address of the JupyterHub we just deployed.:
kubectl --namespace=<namespace-from-above> get svc proxy-public
Copy the IP address under EXTERNAL-IP. This is the IP of your
JupyterHub. Now, add the following lines to config.yaml file:
config:
  BinderHub:
    hub_url: http://<IP in EXTERNAL-IP>
Next, upgrade the helm chart to deploy this change:
helm upgrade <name-from-above> jupyterhub/binderhub --version=0.2.0-3b53fce -f secret.yaml -f config.yaml
For the first deployment of your BinderHub, the commit hash parsed to the
--version argument should be the same as in step 3.4. However, when it comes
to updating your BinderHub, you can parse the commit hash of a newer chart
version.
3.6. Try out your BinderHub Deployment#
If the helm upgrade command above succeeds, it’s time to try out your
BinderHub deployment.
First, find the IP address of the BinderHub deployment by running the following command:
kubectl --namespace=<namespace-from-above> get svc binder
Note the IP address in EXTERNAL-IP. This is your BinderHub IP address.
Type this IP address in your browser and a BinderHub should be waiting there
for you.
You now have a functioning BinderHub at the above IP address.
3.7. Customizing your Deployment#
The Helm chart used to install your BinderHub deployment exposes a number of optional features. Below we describe a few of the most common customizations and how you can configure them.
3.7.1. Increase your GitHub API limit#
Note
Increasing the GitHub API limit is not strictly required, but is recommended before sharing your BinderHub URL with users.
By default GitHub only lets you make 60 requests each hour. If you expect your users to serve repositories hosted on GitHub, we recommend creating an API access token to raise your API limit to 5000 requests an hour.
Create a new token with default (check no boxes) permissions here.
Store your new token somewhere secure (e.g. keychain, netrc, etc.)
Update
secret.yamlby entering the following:config: GitHubRepoProvider: access_token: <insert_token_value_here>
BinderHub will use this token when making API requests to GitHub. See the GitHub authentication documentation for more information about API limits.
3.7.2. Accessing private repositories#
By default, BinderHub doesn’t have access to private repositories (repositories that require credentials to clone). Since users never enter credentials into BinderHub, BinderHub itself must be given permission to clone any private repositories you want BinderHub to be able to build.
Warning
Since cloning is done ‘as binderhub’ this means that any user can build any private repository that BinderHub has access to. They may be private from the wider world, but they are not private from other users with access to the same BinderHub.
3.7.2.1. GitHub#
Granting permission follows the the same steps above in Customizing your Deployment to create a GitHub access token and configure BinderHub to use it. Previously, the token only needed minimal read-only permissions (the default). In order to access private repositories, the token must have full read/write permissions on all your repos [1].
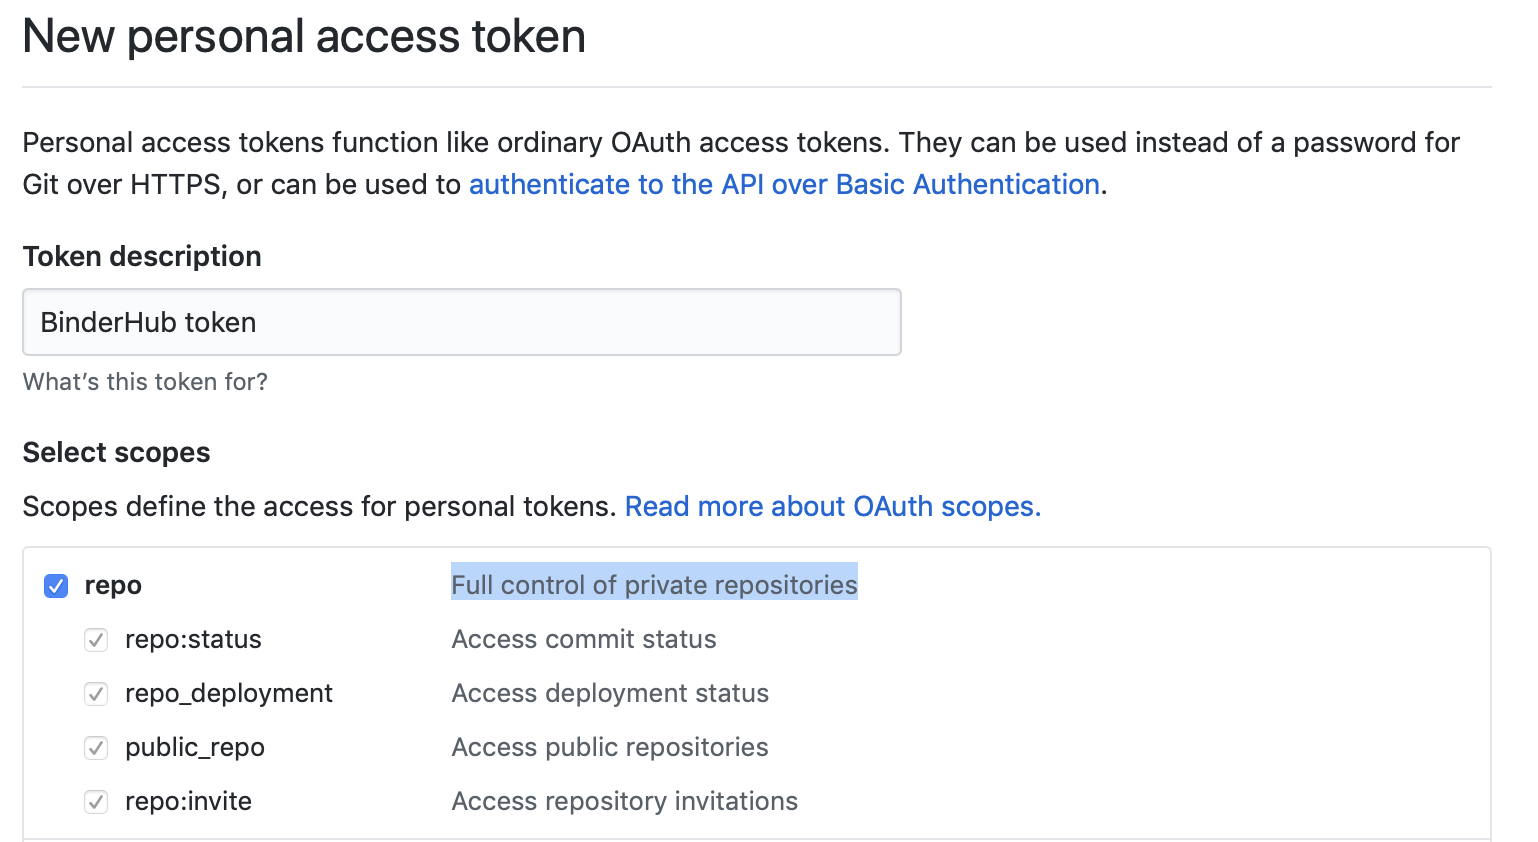
Creating a token with the full repo scope needed
in order to clone private repos.#
You can set these permissions when you create the token, or change them after the fact by editing the token’s permissions at any time at the token administration page.
3.7.2.2. GitLab#
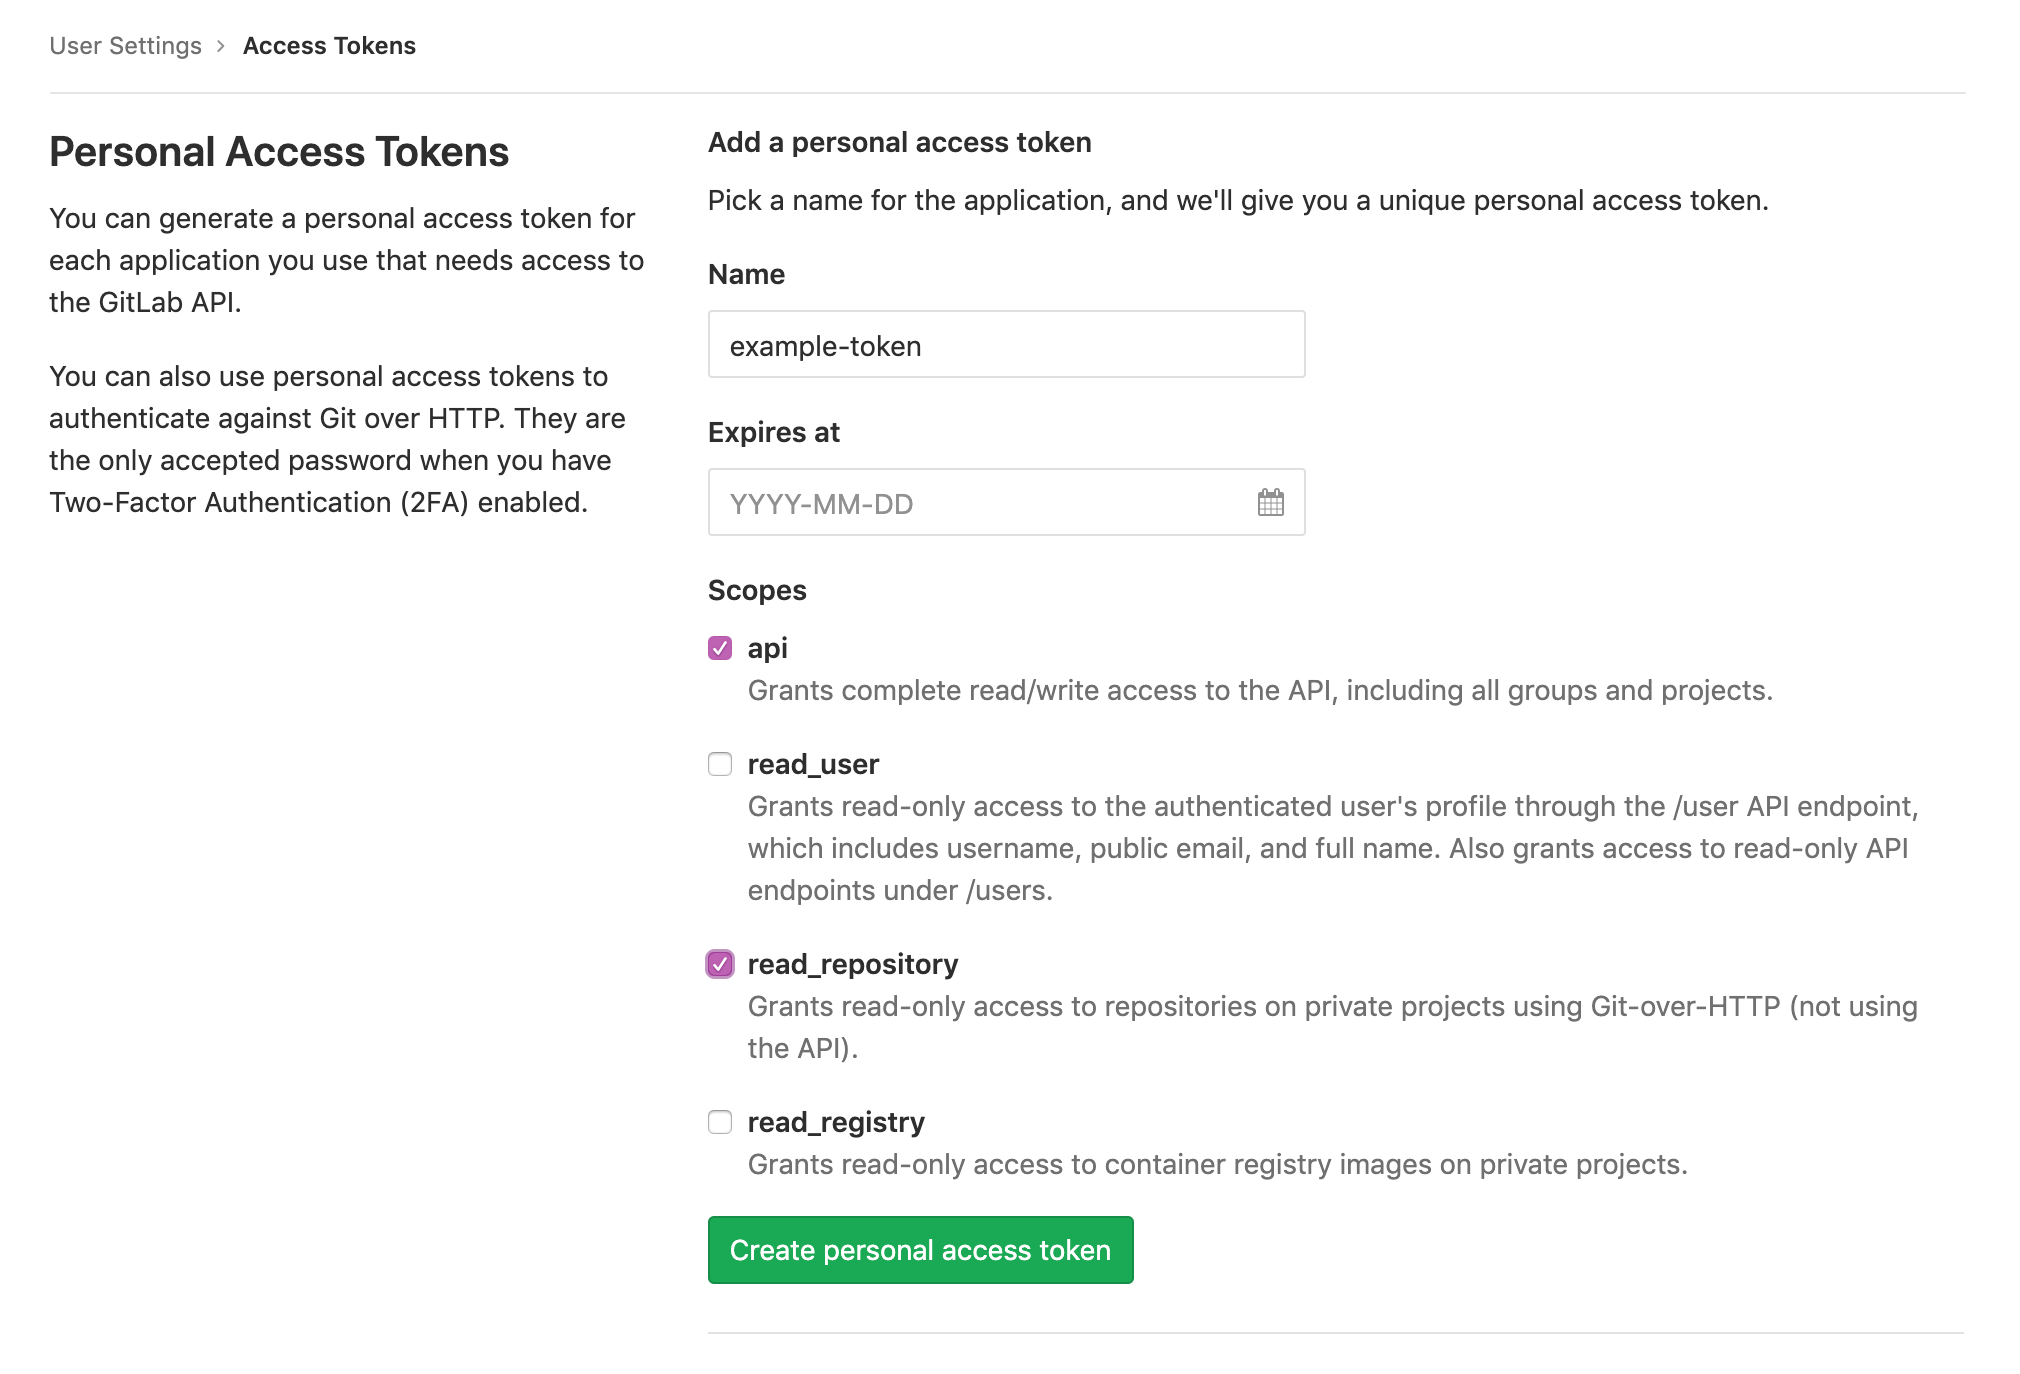
To access private GitLab repos, create an API token for your BinderHub user under “User Settings” > “Access tokens”. It at least needs the scopes “api” and “read_repository”.
Then update secret.yaml with the following:
config:
  GitLabRepoProvider:
    private_token: <insert_token_value_here>
This token will be used for accessing the GitLab API, and is also used as the Git password when cloning repos. With this token, no username is required to clone a repo.
3.7.3. Use Docker-inside-Docker (DinD)#
By default, BinderHub will build images with the host Docker installation.
This often means you are stuck with whatever version of Docker provided by your
cloud provider. BinderHub supports an alternative that uses Docker-in-Docker
(DinD). To turn dind on, you’ll need to set
the following configuration in your config.yaml file:
imageBuilderType: dind
dind:
  daemonset:
    image:
      name: docker
      tag: 18.09.2-dind
If you plan to host multiple BinderHub deployments on the same Kubernetes cluster, you’ll also need to isolate the host socket and library directory for each DinD application:
dind:
  hostLibDir: /var/lib/dind/"<name of deployment, e.g. staging>"
  hostSocketDir: /var/run/dind/"<name of deployment, e.g. staging>"
3.7.4. Use Podman-inside-Kubernetes (PinK)#
In case Docker is not an option, Podman can be used as drop in replacement.
Note that the implications about using a host installation of Podman are the same
as with Docker. BinderHub supports an alternative that uses Podman-in-Kubernetes
(PinK). To turn
pink on, you’ll need to set the following configuration in your config.yaml file:
imageBuilderType: pink
You can optionally override the default podman image:
- pink:
- daemonset:
- image:
name: quay.io/podman/stable tag: v4.2.0
If you plan to host multiple BinderHub deployments on the same Kubernetes cluster, you’ll also need to isolate the host socket and library directory for each DinD application:
pink:
  hostStorageDir: /var/lib/pink/"<name of deployment, e.g. staging>"
  hostSocketDir: /var/run/pink/"<name of deployment, e.g. staging>"
For next steps, see Debugging BinderHub and Tear down your Binder deployment.